Creating a New Project
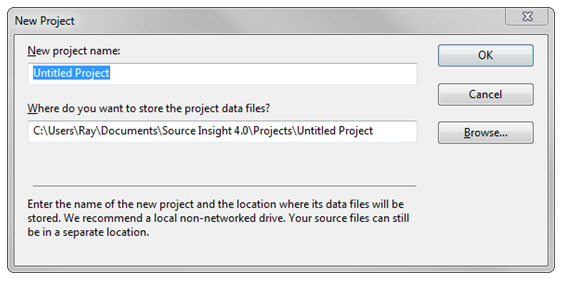
Use the Project > New Project command to create a new project. You must give the project a name and specify where you want Source Insight to store the project data.
You will be asked for a project name, where the files should be stored, and what source files you want to add to the project.

New project name
Enter the name of your project. Source Insight will create several files that start with this name and have different extensions.
Where do you want to store the project data files?
Enter the full path to the folder where you want to save the project data files that are created by Source Insight. They can either be in the same folder as your source files, or in a separate location. By default, they are created under your Source Insight user directory in the Projects folder.
We recommend that your data directory be on a local, non-networked drive for reliability and best performance.
After you answer these two questions, you will be taken to the Project Settings dialog. See: Project Settings.
Where Should You Create A Project?
If you are creating a project for source files that are stored locally on your machine, there should not be any problem creating the project data files in the same directory as your source files.
If you are creating a project that refers to files on a shared server, or any other place that you do not have permission to write to, then you should create the project data somewhere on your local machine. When the Project Settings dialog box appears, enter the location of the your source files into the project source directory field.
The folder you specified as the project data directory will become the default project source directory. In the Project Settings dialog box, you can specify a different path for the project source directory. The project source directory typically is the path of the topmost directory containing your source files. When Source Insight displays file names, the files are displayed relative to project source directory. If you point the project source directory to the directory containing most of your source files, then you will not have to look at a lot of redundant path information.
In addition, the "Add new files automatically" feature (in Options > Preferences: General) only will add new files automatically to your project if the files are in the project source directory or a descendant of this directory.
See: Synchronize Files., and Project Settings.
New Project Settings
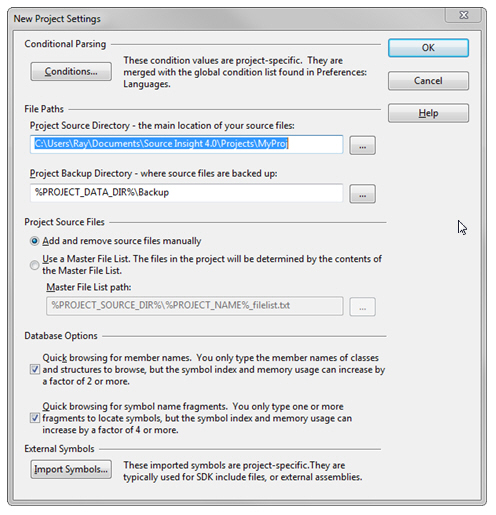
When you create a project, the New Project Setting dialog opens. See: Project Settings.

Setting Index Options for Projects
Name Fragment and Member indexing takes up index space on disk and in memory. It also slows database access a little bit. You can control what is indexed in the Project Settings dialog box.
Two check boxes control indexing:
Quick browsing for member names
Select this to allow member name indexing. When this option is enabled, you can simply type the member names of classes or structures, instead of having the type the class or structure name, followed by a dot (.) and the member name. De-selecting this will save on disk space and memory.
Quick browsing for symbol name fragments
Select this to allow name fragment indexing. When this option is enabled, you can type partial name fragments and find symbols containing those name fragments. Un-checking this will save on disk space and memory. If your project is large, then Source Insight may operate slowly when browsing, or synchronizing files with the symbol database.
If both check boxes are turned off, then the Project Symbol List panel filtering will revert to simple prefix matching. However, the Symbol Window on the left side of each source window, and the Project Window file list will still allow name fragment browsing.